The Windows 10 flash drive is write protected. How to remove write protection from a disk, SD card or USB flash drive
In many companies, specialists install write protection on removable media. This is dictated by the need to protect yourself from information leakage to competitors. But there is another situation when a flash drive is used on several computers, and the best way to protect the information on it from users and viruses is to set a write ban. We will look at several ways to complete this task.
This can be done using the Windows operating system itself, using special software or the hardware capabilities of a USB drive. Let's consider these methods.
Method 1: Use special software
Not every user can confidently work with the registry or operating system utilities (which we'll talk about later). Therefore, for convenience, special software has been created that helps you cope with the described methods by pressing one or two buttons. For example, there is a utility called USB Port Locked, which is designed to block the computer port itself.
The program is easy to use. Moreover, it does not require installation. To use it, do the following:
- Launch it. The standard startup password is "Unlock".
- To block the USB connectors of the machine, select the item "Lock USB Ports" and press exit button "Exit". To unlock them, click "Unlock USB Ports"

This utility helps protect against copying confidential data from your computer to USB drives. But it has a low level of security and is only suitable for ordinary users.
This utility will reliably protect the data on the flash drive from being changed or deleted. It is considered effective because it works at the hardware level. The usage in this case is as follows:

The necessary changes to the system have been made. The program has additional convenient functions, which you can find in the menu "Options".
Another very convenient program for providing write protection on a flash drive is called ToolsPlus USB KEY.
When using a flash drive on a computer, the program asks for a password. And if it is not correct, then the flash drive is turned off. 
The utility runs without installation. For write protection you only need to press one button “OK (minimize to tray)”. When the button is pressed "Settings" you can set up a password and add startup to startup. Write protection is possible with just one press of a button. This program hides in the tray when launched and the average user will not notice it.
The software reviewed is the best protection option for the average user.
Method 2: Use the built-in switch
Method 3: Edit the registry

Method 4: Making Group Policy changes
This method is suitable for a USB drive formatted in NTFS. Read our tutorial on how to make a flash drive with such a file system.
- Insert the flash drive into the computer. Right-click on its icon in "My computer" or "This computer".
- Open the dropdown menu item "Properties". Go to the tab "Safety"
- Under section "Groups and Users" click the button "Change…".
- A list of groups and users will open in a new window. Here, in the list of permissions, uncheck the item "Record" and press the button "Apply".
 After such an operation, it will be impossible to write to a flash drive.
At the moment, all computer users everywhere use USB flash drives to store and transfer their files. It is not uncommon when data cannot be copied because the system writes that the flash drive is write-protected. In this case, you need to figure out what caused the problem and how to remove write protection from the flash drive.
If the flash drive is write-protected, the system will not allow you to write a file to the flash drive until you remove this restriction. There can be two problems due to which the message “The disk is write-protected, remove the protection or use another disk” may appear - hardware (related to the flash drive itself) or software (related to the operating system).
Hardware write protection on a flash drive
There is a small share of USB drives on the market (not only flash drives, but also SD cards) that have mechanical write protection. Such flash drives on which the disk is write-protected are mainly aimed at inattentive users who can accidentally delete necessary files.
Pay attention to the picture above. The USB drive has an “open” and “close” switch, represented by a lock icon. If the switch on your flash drive is in the “closed” position, then writing files to usb will be prohibited.
If your device does not have such a switch, then the disk is write-protected in the operating system settings and interaction with the usb drive controller.
Software write protection
Removing write protection through the Windows registry
To enter the Windows Registry Editor, press the Win+R key combination, enter regedit there and press Enter. Instead of the Win+R key combination, you can click “Start” - “Run”. These actions are equivalent.

On the left side you will see the structure of the registry keys. Go to the registry key HKEY_LOCAL_MACHINE\SYSTEM\CurrentControlSet\Control\StorageDevicePolicies.
However, this thread may not exist. If it is, then look at the value of the WriteProtect parameter. A value of 1 prohibits writing files to the flash drive. Set the resolution to 0, then remove the USB flash drive and restart the computer. The problem should go away.
If you do not have such a branch, then you need to create it. To do this, right-click on the section above Control and select “Create Section.” Provide a name for the new StorageDevicePolicies section.
After that, go to the newly created StorageDevicePolicies section, right-click on the right and select “create DWORD Value”.
Call it WriteProtect and leave the value 0. If the value is 1, then you need to remove it. As in the last paragraph, after this, remove the USB drive and restart the computer. Make sure that the message indicating that the disc is write protected is gone.
Removing protection via the command line
If editing the registry does not help, then there is a way to remove write protection through the Diskpart command interpreter in the Windows command line.
Click “Start” and write cmd in the search bar, then a command line window will pop up. You can also go to the command line in the “Start” menu - “All Programs” - “Accessories” - “Command Prompt”.
At the command prompt, write diskpart and press Enter. After that, write list disk and press Enter again.
You will see a list of computer disks. You need to determine which of them belongs to the flash drive on which the disk is write-protected. In our case, this is disk 2, this can be seen from the size of 8GB.
We write select disk 2 to select our disk, press Enter.
We write attributes disk clear readonly to clear read-only attributes.
After executing the commands, close the command line, remove the flash drive and insert it back into the computer. Try writing something down to see if the problem is resolved.
Removing protection using the Local Group Policy Editor
Click “Start” - “Run” and the key combination Win + R and enter the value gpedit.msc and then press Enter.

The Windows Local Group Policy Editor will open.
Go to the tab “Computer Configuration” - “Administrative Templates” - “System” - “Access to Removable Storage Devices”.
If the "Removable drives: Deny read" option is enabled, if it should be removed. To do this, double-click on the policy and select “disable”, then click OK.
Removing protection using special programs
Now let's look at how to unlock a flash drive if standard Windows tools did not help. You can try to remove the protection using special programs for working with flash drives from different manufacturers, which will allow you to format the disk to remove the write prohibition error.

A free utility that will help you format your flash drive, after which the write protection problem will be eliminated.
JetFlash Recovery Tool

Special program for Transcend flash drives. This program is designed to correct errors on Transcend brand flash drives, including problems with protecting the flash drive for writing files.
I also suggest that you familiarize yourself with the video on this topic, maybe after watching it you will be able to remove the write protection on the flash drive.
If you have any questions, write them in the comments. We will try to help you.
When trying to write data to a flash drive, users are faced with disk write protection, so they are faced with the question of how to remove write protection from a flash drive. A message appears on the computer screen: “The disc is write-protected. Remove protection or use another disk."
It is necessary to remove write protection from a USB flash drive, because it is impossible to copy or add files on the device, or, conversely, delete files from the disk in the Windows operating system. In this case, you will not be able to use a flash drive to perform your tasks.
Such an unexpected situation occurs, which, as usual, arose at the most inopportune moment. The user expects to use a USB flash drive or flash memory card of various types (SD, xD, MS, CF, etc.), but here is this error.
The reasons for the error may be different: due to a hardware malfunction, or the problem is caused by software actions. It happens that the flash memory device simply malfunctions, for example, the electronic filling burned out, so there is nothing you can do to help here.
Sometimes you cannot use a flash drive due to viruses. Checking the flash drive using an antivirus program and removing malicious software from the disk will help you get out of the situation.
The main reasons for blocking writes to flash memory devices:
- hardware failure of the drive;
- write protection using physical locking;
- virus infection;
- changing the disk attribute to read-only mode.
If the flash drive is write-protected, what should I do, how to remove the protection? In this guide, we will look at 5 methods that help remove write protection on a flash drive. In most cases, this problem is solved successfully.
How to remove write protection from a flash drive physically
SD cards and some USB flash drives have a switch that can be used to disable/enable the drive's recording mode. In this case, the flash drive or micro flash drive (memory card) is write-protected mechanically.
On the body of a flash drive or memory card there is a special switch marked with the word “Lock” with a picture of a lock. Move the switch to a different position, and then check the operation of the flash drive on your computer.
How to remove write protection from a flash drive on the command line
If the flash drive says: remove write protection, you can use the command line to remove the read-only attribute from the disk.
Follow these steps:
- Run Command Prompt as an administrator (read how to run Command Prompt in Windows 10).
- In the command line interpreter window, enter (after entering the appropriate command, press the Enter key):
- Next, enter the command to display all drives on your computer:
- The Command Prompt window will display all drives connected to the computer. We need to choose a flash drive number, which can be easily determined by the size of the disk.
On this computer, the flash drive has a size of 8 GB (7712 MB), so I should select the number “1”; on your computer, the flash drive may have a different disk serial number.

- Enter the command to select a volume (disk):
- Next, run a command that clears the attributes of the selected drive:

Close the command line interpreter. Check the operation of the flash drive on your computer.
How to disable write protection of a flash drive in Registry Editor
By changing the Windows registry, you can disable write protection for flash drives.
To do this, do the following:
- Press the “Win” + “R” keys on your keyboard at the same time, and in the “Run” window, enter the command “regedit” (without quotes).
- In the Registry Editor window, follow the path:
- In the “StorageDevicePolicies” section, right-click on the “WriteProtect” parameter, and in the context menu click “Edit...”.
- In the "Edit DWORD (32-bit) Value" window, in the "Value" field, enter the value "0" (without quotes), and then click on the "OK" button.

- Restart your computer.
If the "StorageDevicePolicies" key is not in the registry, create it. To do this, right-click on the “Control” section, select “New” => “Section”.
In the "StorageDevicePolicies" section, create a DWORD value (32 bits) named "WriteProtect", set the value to "0". Reboot your system.
How to remove the write ban on a flash drive in the Local Group Policy Editor
A write ban on a removable drive can be set in the Windows Local Group Policy Editor. In this case, you need to disable the ban in the following way:
- Press the “Win” + “R” keyboard keys, in the “Run” window that opens, enter the command “gpedit.msc”, and then click on the “OK” button.
- In the Local Group Policy Editor window, go to: “Computer Configuration” => “Administrative Templates” => “System” => “Access to Removable Storage Devices”.
- Right-click on the "Removable drives: Deny writing" policy, in the "Removable drives: Deny writing" window, set the option to "Disabled", and then click on the "OK" button.

Check for a problem with the removable drive.
Troubleshooting by formatting a flash drive
If the flash drive has the FAT32 file system (FAT16, FAT, exFAT), then you will not be able to move files larger than 4 GB to the USB drive. To support the use of large files on a flash drive, you need a drive in the NTFS file system.
In other cases, formatting to the default file system sometimes helps to restore functionality to a problematic flash drive.
Using utilities to recover flash drives
Specialized utilities from device manufacturers will help you cope with many problems that arise in the operation of USB flash drives. Well-known manufacturers: Transcend, Silicon Power, ADATA, Kingston, etc., have created software to restore the functionality of their devices.
Using the programs: JetFlash Online Recovery, USB Flash Drive Recovery, USB Flash Drive Online Recovery, Kingston Format Utility, solve problems that arise when working with flash drives.
If these utilities do not help, use more advanced programs: HP USB Disk Storage Format Tool, AlcorMP, D-Soft Flash Doctor.
Conclusions of the article
If a problem occurs with the write protection of the disk, the user cannot use the flash drive. Using various tools, you can try to solve the problem that has arisen: remove write protection from the flash drive.
Experienced PC and Internet user
Transcend, Microsd and Sandisk flash drives, despite their resistance to various types of mechanical damage and the ability to save data for decades, sometimes still fail. One of the most common problems with these drives is the message “The disk is write protected. Remove the protection or use another disk” (The disk is write-protected), which is displayed on the screen by the Windows 7 - 10 operating system. Let's look at how to remove write protection on a flash drive.
Preliminary work
- check the flash drive for viruses. Malicious files may cause the "Disk is write protected" message. If you find them on a flash drive - immediately;
- look at the casing of your USB drive. Some products from Transcend, Microsd or Sandisk have a mechanical switch that puts them in a write-protected position. This switch may inadvertently switch in your pockets and create a problem. If this happens to you, simply move the switch to the open position;

- Make sure the USB drive is not full. If your box is full, you may also receive a message from Windows about an error in the entry.
- You also need to make sure that the flash drive is not using a write-protected file. Yes, the error message will be different, but you may jump to conclusions by deciding to block the entire USB drive.
Disc is write protected - Transcend
For a Transcend flash drive, the “Disk is write-protected” error can be resolved using the JetFlash Recovery utility, which was developed by the engineers of this company. This program is distributed free of charge, we recommend downloading it from the official website at https://us.transcend-info.com/Support/Software-3/.

Disk is write protected - Microsd, Sandisk
How to remove write protection on a flash drive? We will use the command line. Here are the step by step steps:
- launch the command line as administrator (in the Windows 8 and Windows 10 operating systems using Win+X, in Windows 7 - using);
- In the command line, enter the command Diskpart and press Enter. Then enter the list disk command and look for your USB drive in the list of disks (you will need its number);
- Enter the following commands in order, pressing the Enter key after each entry:
- select disk N(where N is the number of your flash drive from the previous step);
- attributes disk clear readonly;
- exit;
- close the command line.

Now all we have to do is perform some actions with our flash drive (write a file there, format it, etc.) to check whether the error has been resolved, whether the error “The disk is write-protected” has disappeared. Remove protection or use another disk."
The era of floppy disks has already sunk into oblivion; now people everywhere use new generation drives - flash drives. This device is compact and can hold a large amount of data. But even flash drives are far from perfect. Quite often, various problems arise when working with flash media. For example, the most common error is that when working with a storage medium, the OS writes “The disk is write protected.” What does this mean, and how to remove write protection from a flash drive? We will talk about this in this article.
Flash drive protection may be hardware or software based. It is for this reason that there are many ways to remove write protection. Let's talk about each in more detail.
If you don’t know how to remove protection from a memory card or flash drive, then first turn your attention to the device’s case. Most likely the root of the problem is mechanical protection. Each MicroSD card and some flash drives have a special switch on the case. It is responsible for activating write protection. Surely the switch in your pocket changed its position, which led to problems. It's all very easy to fix. You just need to change the position of the switch. 
In addition, it is worth checking the functionality of the flash drive. To do this, try connecting it to a different port. It’s better to test the drive on another PC, if possible. If everything is in order, then the problem lies in the software.
Software problems
If the device works correctly and the mechanical switch is in the correct position, you need to know how to remove protection from the disk programmatically. There are several ways to do this. Let's look at them in more detail.
NTFS formatting
By default, the flash drive is formatted in FAT32. However, this file system has one limitation that few people know about: the maximum amount of recorded data should not exceed 4 GB. This leads to a rather ambiguous situation. On the one hand, writing is allowed, but on the other hand, due to FAT32, it is impossible to upload a large file to a flash drive.
To remove write protection from a flash drive, you need to format the drive and change the file system from FAT32 to NTFS. There are no restrictions regarding the amount of data recorded. Therefore, the question of how to unlock a flash drive will disappear by itself. To change the file system, you need to connect the drive to the PC and go to “Computer”. Before formatting the flash drive, save its contents to your PC. 
Find your device there and right-click on it. Select "Format" from the drop-down list. A new dialog will open in which, next to the “File system” inscription, you need to set the NTFS option. Once done, click on “Get Started”. The formatting process will start, during which all data from the drive will be deleted and the file system will change to NTFS.
It is recommended to remove the flash drive from the USB connector using “safe removal”. However, when it comes to NTFS, this is not a recommendation, but a strict rule that must be followed. Otherwise, you risk harming your device.
Windows Registry
It's no secret that the registry is a real lifesaver for any Windows OS user. Using this section you can solve almost any problem. Locking a storage device is no exception. How to fix this problem? To remove protection from a flash drive or microSD, you must perform the following manipulations:

Sometimes the StorageDevicePolicies section may simply not be on your PC. How can you remove protection from a flash drive in this case? Just create StorageDevicePolicies manually. Right-click on the previous directory (in our case it is Control), then in the menu that appears, click on “Create”, and then select “Partition”. The system will prompt you to enter a name. We drive in StorageDevicePolicies there, after which we create a section. 
Next, you need to go to the directory that appears and right-click on the menu located on the right. In the list that appears, click on “Create”, and then select the “DWORD Value” option. We select the bitness characteristic depending on your system (64 or 32 bits). We call the new parameter WriteProtect and set its value to 0. Again, restart the PC and check whether the information is written to the flash drive.
Group Policy
If the disk is protected and it was not possible to fix it through the registry, you need to check group policy. Perhaps it is she who prohibits writing data to the media. To test the policy, you need to do the following:

Command line
Another way to remove protection if the flash drive is write-protected is to interact with the command panel. To restore the correct operation of the flash drive, follow these instructions:

After completing all the steps described above, the notification that the flash drive is write-protected should no longer bother you.
Software
Flash drive manufacturers take care of their customers by creating special utilities that can restore problematic devices. If you are faced with the fact that the flash drive is not formatted, cannot be written, etc., then simply use a proprietary program. It is worth noting that when choosing software to restore the functionality of a flash drive, you need to pay attention to the manufacturing company. If you use devices from Transcend, then a program called JetFlash Recovery is suitable for you; owners of flash drives from Silicon Power should use USB Flash Drive Recovery, etc. You can download the utility from the manufacturer’s official website. 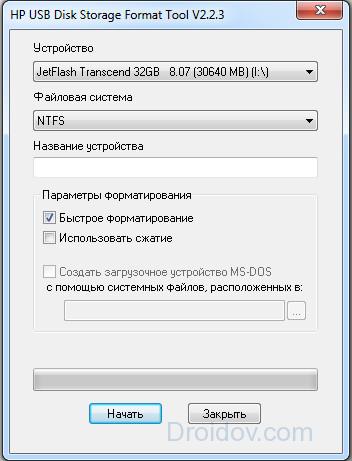
In addition, there are a lot of third-party programs that can also solve recording problems. Among such utilities, it is worth highlighting D-Soft, Flash Doctor, etc. As a rule, the process of restoring a flash drive using these programs is simple and straightforward. You need to configure the formatting parameters and click on “Start”. Once the cleaning is complete, the flash drive's protection will be deactivated and you will be able to write various information to the device.
Virus
If none of the above methods helped, then the root of the problem is probably malware that has “settled” on your drive. There are many viruses on the World Wide Web. And some of them are capable of blocking writing to a flash drive.
What to do if there is a virus on the drive? Get rid of it using one of the modern antiviruses. Run a disk scan and then remove potentially dangerous files. After this, the recording problem should be resolved.