Installing sata driver. Installing a hard drive on a computer - how to avoid mistakes
You bought a new hard drive. Of course, with a Serial ATA interface. And, of course, we heard a lot about the new interesting feature implemented in the latest models - NCQ. Anticipating a noticeable increase in the loading speed of Windows and programs, as well as a reduction in the noise of the hard drive, you connect the hard drive, install the operating system and... Now you will need to do additional manipulations to enable AHCI support and install the appropriate drivers. Otherwise, NCQ technology, as well as other interesting functions, will remain unused.
For what
The idea underlying the NCQ (Native Command Queuing) technology has been implemented more than once in hard drives and controllers, but not in those used in ordinary personal computers.
So this is the principle behind NCQ. As you know, the hard drive is quite slow compared to other PC devices due to its mechanical nature. Particularly a lot of time is spent moving the heads between the tracks on which the sectors with data requested by the system are located. To minimize these movements, you can use the method of reordering the command queue, well known in computer science. In this case, the distance between the tracks to be accessed is used as a restructuring criterion. Read commands coming to the hard drive from the system are not executed in order, but accumulate in a queue. There they are swapped in such a way that the head moves as little as possible when executing neighboring requests. Due to this, acceleration is achieved.
A classic example used to illustrate the effect of reordering is an elevator in a building. Imagine that he moves through the floors in the order in which the buttons on the panel were pressed. But the elevator works much more efficiently - it opens the doors on the floors in the direction of travel. Yes, some passengers have to wait longer, but others get to the desired floor much faster.
Actually, after giving the example of the elevator, some disadvantages became obvious to you. Not all requests will be completed faster - some may get stuck in the queue, allowing other requests to pass through. And the appearance of a write request generally complicates the processing of the command queue, since a situation of data integrity violation is possible.
In addition, such technology will only provide benefits if commands to the hard drive are received in a dense stream and much faster than it can execute them. In modern PCs, this situation does not happen very often - mainly at the time of loading the OS and large software packages. Therefore, the implementation of NCQ technology has only recently been undertaken, although in a server environment, intelligent command reordering has been used for a long time and successfully.
It should be noted that the ability to change the order of commands and process queues is also included in the ATA interface protocol (TCQ technology). And there are even examples of its quite successful implementation. But it was not done very nicely or conveniently. The fact is that the ATA interface protocol, on which hard drives with a regular, “parallel” interface operate, is based on the ISA bus protocol. The initialization and command transmission procedure, as well as monitoring status and errors, is a rather lengthy and complex procedure that requires analysis of several registers. Therefore, the developers decided to implement support for this technology in hard drives using the new interface - Serial ATA.
AHCI protocol
The Serial ATA controller, according to the requirements of this standard, must support at least two operating modes. First - emulation mode of a standard ATA controller (Legacy Mode). In this mode, the controller completely repeats the protocol for accessing the ATA hard drive and, from the point of view of the operating system and drivers, is no different from the “parallel” interface controller. In this case, the hard drives connected to it are emulated either as Master devices on a separate channel, or, if the operating system “does not understand” more than two channels, as pairs of Master and Slave devices. This mode is enabled by default and is fully supported by all operating systems and BIOS.
The problem is that in emulation mode, the implementation of additional Serial ATA functions is partially or completely impossible, otherwise compatibility with the classic ATA implementation will be broken. Therefore, the controller has the ability to switch to “native” Serial ATA mode, which does not have any “family obligations” that bind it to the ATA.
AHCI (Advanced Host Controller Interface) protocol just describes the behavior of the controller in Native mode from a system point of view. It describes how the controller processes the command queue, where and how they are stored, how the programmer should place commands in the queue, and where to obtain the results of their execution. All conventions of the ATA protocol have been discarded, all difficulties with manipulating registers and flags have been eliminated as unnecessary. The implementation of all additional Serial ATA functions, including NCQ, Hot Swap, Port Multiplier, Staggered Spin-Up, etc., is now unlimited.
Native Mode is designed to work with operating systems Windows 2000, XP, Vista, Windows 7.
In other words, AHCI protocol functions only work in Native Mode Serial ATA.
This protocol was developed by a special initiative group led by Intel. It is an addition to the Serial ATA standard, which, in general, does not describe the requirements for host controllers (controllers on the side of the computer system to which the hard drive is connected). Together with AHCI, the Serial ATA standard is a complete solution for organizing the disk subsystem in a new generation PC.
At the same time Compatibility with software that does not natively support Serial ATA is lost. The controller cannot operate in two modes at the same time. By switching to Native mode, it loses the ability to accept commands from software that does not “understand” the AHCI protocol. Let us remember that Windows XP does not work natively with Serial ATA in Native Mode AHCI, but Vista and Windows 7 support it.
How to enable AHCI
Method one, classic. As with creating a RAID, you use the installation floppy that came with the motherboard or you created yourself. You start installing Windows, get to the first reboot, and when “Press F6...” appears at the bottom of the blue screen, press F6 and be offered a floppy disk. You should select the correct driver option and continue installing Windows. Subsequently, when the installation is completed successfully, it will be useful to install the drivers and utilities again - they will allow you to make some settings and make sure that NCQ is enabled.
The second method is more complicated, but it allows you to do without a floppy disk and without reinstalling Windows. To do this, your computer’s BIOS must have the ability to disable AHCI (or Native Mode, which in this case are synonyms). When emulation mode is enabled, you install Windows, and then install drivers from the controller manufacturer (motherboard chipset). If they are not installed automatically, do it manually. Then you enable AHCI in the BIOS, and the system begins to take advantage of NCQ.
Using Intel as an example
In Intel chipsets, AHCI support appeared in the 915 series. However, only in southbridges with the suffixes “R”, “M” and “DH”:
- ICH6R, ICH6M - 915/925 series chipsets;
- ICH7R, ICH7M, ICH7DH, ICH7MDH - 945/955/975 series chipsets;
- ICH8R - 965 series chipsets.
- ICH9R - P35 series chipsets
Only laptops on the Centrino platform, starting from the second generation, and motherboards on series chipsets - 925, 955, 975... As a rule, if AHCI is supported, then the BIOS will have a corresponding line. As a last resort, you can look at the manual for the motherboard.
The AHCI controller is integrated into the chipset with the following controller hub:
- Intel® ICH10R/DO SATA RAID/AHCI Controller Box
- Intel® ICH10D SATA AHCI Controller Box
- Intel® ICH9M-E SATA RAID/AHCI Controller Assembly
- Intel® ICH9M AHCI Controller Assembly
- Intel® Controller Assembly 82801IR/IO (ICH9R/DO) - RAID and AHCI
- Intel® 82801HEM I/O Controller Hub (ICH8M-E) - RAID and AHCI
- Intel® I/O Controller Hub 82801HBM (ICH8R) - AHCI only
- Intel® I/O Controller Assembly 82801HR/HH/HO (ICH8R/DH/DO) - RAID and AHCI
- Intel® I/O Controller Hub 631xESB/632xESB - RAID and AHCI
- Intel® 82801GHM I/O Controller Hub (ICH7MDH) - RAID only
- Intel® I/O Controller Assembly 82801GBM (ICH7M) - AHCI version only
- 82801GR/GH (ICH7R/DH) I/O Controller Block - RAID and AHCI
- Intel® I/O Controller Assembly 82801FR (ICH6-R) - RAID and AHCI
- Intel® 82801FBM I/O Controller Hub (ICH6M) - AHCI only
You will need Intel Matrix Storage drivers, formerly Intel Application Accelerator, and their installation floppy. Its image can be downloaded from the Intel website. The drivers from this floppy disk will be useful both for installing Windows and for enabling AHCI after installation. In the latter case, be sure to install the Intel INF Update before you begin manipulating other drivers. Once the standard Serial ATA controller drivers have been replaced with the drivers from the Intel installation diskette, you can enable AHCI. Windows will be able to boot, and you can then continue installing the Matrix Storage kit - without enabling AHCI, it will refuse to start. For controllers from other manufacturers, the procedure is similar - first install the drivers, then enable AHCI.
In this case, the hard drive is not affected - format, change, etc. do not need anything.
Step-by-step instructions for m/b Intel with south bridges ICH6R, ICH6M, ICH7R, ICH7DH, ICH7M, ICH8R, ICH9R
Note: below we are talking about 32bit versions of Windows. Of course, there is a driver for x64 as well. It's easy to find.
- Make sure that AHCI is disabled in the BIOS and do not forget to backup the Windows folder. I also recommend making a spare boot disk.
- Download 79im05ww.exe and unpack it, for example, to C:\DRIVERS\WIN\SATA
- In case you have ICH7M, go to step (5)
- Edit C:\DRIVERS\WIN\SATA\PREPARE\IMSM_PRE.inf replacing all DEV_27C5 values corresponding to your southbridge:
- ICH6R - DEV_2652
- ICH6M - DEV_2653
- ICH7R - DEV_27C1
- ICH7DH - DEV_27C1
- ICH7M - DEV_27C5
- Press Win+R, enter C:\DRIVERS\WIN\SATA\PREPARE\INSTALL.CMD, click Ok
- Restart your PC and enable AHCI support in the BIOS
- When the OS boots, the wizard for detecting new devices will start:
- For Windows XP, select No, not this time, then Install from a list or specific location (Advanced) and specify C:\DRIVERS\WIN\SATA as the path
- For Windows 2000, select Search for a suitable driver for my device (recommended), then Specify a location and specify C:\DRIVERS\WIN\SATA
Solutions for board with ICH8R:
- To install Windows XP with AHCI enabled, you must first create a floppy disk with the AHCI driver. Everything you need for this is on the disk that comes with the motherboard.
When installing Windows XP SP 2, place the floppy disk with the driver in the FDD reader. When the Windows installer asks you to “Press F6 to install a special SCSI or RAID driver,” press F6 and select the AHCI driver from the list provided.
- in the event that you do not have a floppy disk reader, or Windows XP is already installed in the SATA - IDE operating mode, you can integrate the necessary driver directly into the operating system.
This is done as follows.
We go to the device manager and find IDE ATA/ATAPI controllers in the list.
We update drivers for controllers (by default there are 2).
To do this, select Update driver => Do not search. I will choose the right driver myself.
Specify the path to the Drivers\Chipset\Intel\makedisk\DOS\F632 folder on the installation disk for the motherboard.
Uncheck “Only compatible devices” and select Intel ® ICH8R/D0/DH SATA AHCI Controller from the list. (this is true for both controllers!!!).
The system will ask you to reboot - do it. When rebooting into the BIOS, select the controller mode - AHCI.
Installing Windows XP on laptops with Vista and Serial ATA AHCI
As the developers of this operating system admit in a special document (http://www.microsoft.com/whdc/device...alATA_FAQ.mspx), the disk subsystem of all versions of Windows released before Vista will not support AHCI. They explain this by the presence of features in the implementation of AHCI by manufacturers of different controllers. In the future, the Windows kernel will implement a new mechanism for connecting drivers - Ataport, and the drivers will include a standard miniport for the Native mode of the Serial ATA controller. In the meantime, alas, you need to install a special driver or SCSI miniport directly from the controller manufacturer.
This problem is more complex than it seems at first glance. The Windows operating system is designed in such a way that at startup it must “pick up” the correct driver for the hard drive controller. Otherwise, the start is interrupted by the notorious “blue screen”, which can only be gotten rid of by reinstalling the system. Moreover, the installation process will also be interrupted by the same “blue screen” if you do not provide Windows with a floppy disk with the required driver in time. You won’t envy the owners of laptops at all - they have nowhere to insert a floppy disk, and Windows in this case does not accept other media.
So, we install Windows XP on a laptop with AHCI.
In most cases, trying to install XP in emulation mode results in a BSOD (“blue screen of death”) with the following error:
STOP 0x0000007B INACCESSABLE_BOOT_DEVICE
As already mentioned, there are 2 ways to install Windows XP with SATA Native Mode enabled in the BIOS: adding drivers to the distribution when loading via F6 or modifying the operating system in such a way as to already integrate the necessary drivers into the distribution.
In the first case, Since there is no flop drive in the laptop, the only way out is to use a USB Floppy Drive, which is not that cheap.
Driver integration into a distribution kit is more complex, but economically more feasible.
There are quite a lot of distribution kits (assemblies) with already integrated drivers; just download one from the Internet and burn it to a disc. If you cannot find such an assembly, then all that remains is to integrate the drivers yourself into the distribution using the nLite program.
For example, for the Intel platform with ICH7-ICH8 (Intel ® Matrix Storage Manager) these are the standard files:
- iaahci.cat
- iastor.cat
- iaahci.inf
- iastor.inf
- txtsetup.oem
- iastor.sys
During installation of Windows Vista, all unused storage device drivers are disabled. This allows you to increase the operating system startup speed. If you are replacing a boot disk driver with a driver that was disabled, you must enable the new driver before changing the SATA configuration in the BIOS.
Suppose you are installing Windows on a computer with a controller that uses the driver Pciide.sys. The user then performs a mode change from SATA to AHCI. The drive should now load the Msahci.sys driver. However, before making such changes, you must enable the driver Msahci.sys. This problem only applies to the boot disk. If the change is made to a drive that is not bootable, this issue does not occur.
To troubleshoot problems, enable the AHCI driver in the registry before changing the boot drive's SATA mode. To do this, follow these steps:
- Launch the registry editor regedit.
Find and highlight the following registry subkey: - HKEY_LOCAL_MACHINE\System\CurrentControlSet\Services\Msahci
- In the right pane, right-click the option Start in column Name, then click Change.
- In field Meaning enter 0 and click the button OK.
- Close Registry Editor.
The method is professional. Instead of integrating the drivers into the distribution, you can try writing the file \i386\winnt.sif and putting it in the distribution, in which you can write the paths to the folders with the driver.
Something like:
OemPnpDriversPath = "Drivers\megaIDE;Drivers\ICH85;Drivers\ICH78;Drivers\ICH62;Drivers\!inf;Drivers\lan.Pro100;Drivers\lan.Pro1000;lan.Drivers\lan.rtl8169;Drivers\IntelVGA895;Drivers\ IntelVGA845;Drivers\lan.Marvell;Drivers\lan.Attansic;Drivers\jMicron;Drivers\ATK100;Drivers\ATK110"
should not be accompanied by any difficulties. At the request of a visitor to our site, let's go through all the stages connecting a SATA hard drive from installing it in the system unit to defining it in the BIOS. We will install a Western digital disk drive (465 GB, IDE) of the Serial ATA II standard.
Note: You may also find articles on this topic useful: How to install in a system unit, and!
to the Asus P5K SE motherboard with four SATA connectors on board

The Optiarc DVD RW drive is already connected to one connector and, according to rumors, it works, so now we’ll check everything, we’ll start working with the computer turned off.
First of all, we insert our hard drive into a special basket of our system unit, there is no need to remove any video card, it is located above and we place the hard drive just below it, it fits perfectly into the place offered to it

You can see that there is enough space under it for ventilation, then we secure it with four screws. There are special rubber washers between the cage and the hard drive case, a feature of this 6AR1 case.
And here are our four SATA controller connectors on the motherboard, connector number three is occupied by the disk drive, and the other three are free, select one of them, for example connector number one

We will not connect the SATA data cable for now, it will interfere with us when connecting the power cable to our hard drive, so we connect our hard drive and the power supply.
There is a free cable coming from the power supply, connect it to the power connector on the hard drive, connect

if your power supply does not have a cable with a SATA connector, you will need this adapter

Now it’s the turn of the data cable, with absolutely identical L-shaped plugs at the ends

connect one end of the cable to the motherboard and the other to the hard drive


Now close the side cover of the system unit and turn on the computer.
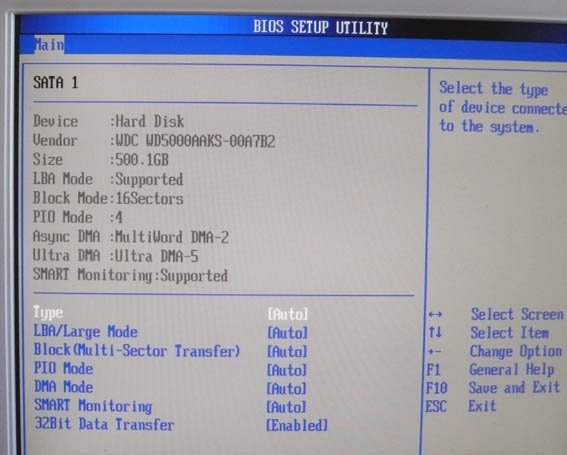
We immediately go to the BIOS and see if we are doing it right connected a SATA hard drive. On the initial Main tab, you can see that our Western digital hard drive is detected on the first SATA controller, and our Optiarc DVD RW drive is detected on the third, as expected.

All information about our hard drive
To install the operating system, we need to change the boot priority from the hard drive to the drive on the Boot tab, go to this tab and change

We insert the Windows distribution kit into the drive, reboot and install the operating system.
And sometimes friends are such a seemingly simple action as connecting a SATA hard drive to the motherboard, turns into a whole adventure. Our reader Alexander faced such a problem. The SATA connectors on his motherboard were located inconveniently, next to the PCI Express connector of the video card. So, it was almost impossible to connect this same video card if the hard drive was already connected to the SATA connectors, the video card simply rested against the SATA interface cables and was not completely inserted into its PCI Express connector. Alexander got out of the situation this way: he bought two SATA interface cables, with a connector in the form of an angle, and even cut one like this and then connected everything.

In this article we will look at installing hard drives. In particular, we will consider their configuration and physical installation.
In order to install a hard drive into your computer, you must do the following:
- configure the drive;
- configure the controller or interface device;
- install the drive into the computer case;
- configure the system as a whole to recognize the disk;
- perform logical disk partitioning;
- perform high-level formatting of partitions or volumes.
Before you begin installing a hard drive, it is advisable to read the documentation for this drive, controller or main adapter, system BIOS and some other computer devices. But, as a rule, this will not give anything to the average user, so the documentation can be put aside. In modern computer systems, it is optional.
If, nevertheless, you decide to read the documentation, the assembly company will provide you with only limited information about this device. Typically, complete documentation should be found and downloaded from the device manufacturer's website. The same applies to other devices of most systems that are on the market today.
Hard Drive Configuration
Before you begin installing the hard drive, you need to configure it. IDE drives most often require the installation of a master-slave switch, or you can also use the Cable Select option and an 80-wire cable.
To configure Serial ATA hard drives, these jumpers do not need to be installed. There are cases that drives still have such jumpers installed directly at the factory.
SATA hard drives are connected to the SATA controller using a cable, forming a point-to-point connection.

Unlike hard drives based on the parallel ATA interface (obsolete version), SATA drives have neither master nor slave devices. The picture shows that some SATA drives have jumpers to allow compatibility. In modern hard drives with a data transfer rate of 300/150 Mbit/s, to switch to a slower mode, which is necessary for older controllers to work correctly, you need to change the jumper. For reasons of compatibility with drivers and other software, most controllers can operate in “compatibility mode,” which emulates a master-slave configuration, but does not physically implement this mode.
HDD controller configuration
The hard drive controller in older models is installed in the motherboard connector. All recent IDE and SATA drives have a built-in controller on the motherboard. Almost always, the ATA device controller is integrated into the motherboard and configured using the BIOS setup program. In this case, there is no separate controller. Some systems may have a controller on an expansion card in addition to the integrated controller. This situation can occur when the integrated controller does not support the faster data transfer modes (300 Mbps for SATA and 133 Mbps for PATA) found in newer hard drives.
In such cases, there is no need to resort to installing a controller into the motherboard; it is better to upgrade the motherboard itself, so you will get additional functionality and spend a little more.
There are also cases when adding a controller board makes sense, for example, a new SATA drive is “suspended” on an old motherboard that does not have this controller.
Controllers on expansion cards require a specific combination of the following system resources:
- Boot ROM address (optional);
- interrupt (IRQ);
- direct memory access (DMA) channel;
- I/O port address.
Not all controllers use each of these resources, but some do. In most cases, modern Plug and Play controllers and systems are automatically configured by the computer's underlying I/O system and operating system. The system allocates resources that do not lead to conflicts with other computer devices.
If the operating system or hardware does not support Plug and Play technology, then the adapter must be configured manually. Some controller boards include utilities that allow you to perform this configuration programmatically, while other controllers have a number of switches or jumpers for this.
The ATA interface driver is part of the standard computer BIOS and allows you to boot from PATA and SATA devices. In such systems that contain a SATA interface on the motherboard, the driver for this interface is also built into the BIOS. The BIOS provides the device functionality that the system needs to access the drive before it can load any file from it.

Notice!
Although the Windows operating system (OS) supports standard IDE/ATA drivers, this type of interface is usually built into the southbridge or I/O controller components of the motherboard chipset and requires special drivers to be loaded. If you are using a motherboard that is newer than your OS version (for example, a new motherboard purchased in 2010 that runs Windows XP), make sure that the chipset drivers are installed immediately after installing Windows supplied with the motherboard. If the controller supports the SATA interface in ACHI (Advanced Host Controller Interface) mode or the SATA RAID array (Redundant Array of Independent Disks), and the computer is running Windows XP or an earlier version, installation usually requires driver located on a floppy disk or pre-recorded on the Windows installation disk.
Keep in mind that all of these drivers are included with the installation of Windows Vista and 7. If the controller is older than the operating system you are installing, the necessary drivers will most likely be included on the installation CD. At the same time, it is always recommended to search the Internet for the latest version of the controller driver and install it immediately after the operating system.
There are SATA controllers that have their own BIOS that supports ACHI, RAID, large disks or other functions. If you are not going to use these functions or the motherboard BIOS itself has this support, then it is not necessary to use the controller BIOS. Many controllers on expansion cards have switches, jumpers, or support programs that allow you to enable or disable BIOS support.
In addition to boot functions, the controller BIOS provides other functions such as:
- configuring a RAID array;
- controller configuration;
- diagnostics.
When the controller BIOS is enabled, it requires address space in the upper memory area (UMA), which occupies the last 384 KB of the first megabyte of system memory. The upper memory is divided into three sections of two segments each 64 KB in size, with the first section allocated for the video adapter memory, and the last for the system BIOS. Segments C000h and D000h are reserved for BIOS adapters, in particular for hard drive controllers and graphics controllers.
Notice!
The memory areas occupied by the BIOS of different adapters should not overlap. Most boards have switches and jumpers that can be used to change BIOS addresses; sometimes this can be done programmatically, thereby preventing a possible conflict.
Mounting Hard Drives
Hard drives are mounted in the computer case. This requires the appropriate screws, brackets, bezel, etc.
To install some drives, you will need plastic guides that are attached to the device on both sides and allow you to install it in the appropriate place in the case.

These guides should be included with your computer case or hard drive when you purchase it.
Since PATA and SATA devices use different types of cables, check that the cable matches the controller and drive. To use PATA mode with speeds of 66 Mbit/s and faster (up to 133 Mbit/s), you will need an 80-core cable. It is also recommended to use it at lower data transfer rates, such as 33 Mbit/s and less. To determine which cable you have (40- or 80-core), count the bumps on the cable - each bump corresponds to one core. One of the characteristic features of an 80-wire cable is the color of its plugs: those inserted into the motherboard are painted blue, and those inserted into the master and slave devices are black and gray, respectively.

If you plan to install a 3.5" hard drive in a 5.25" frame, you will need a different type of mounting pads. Most 3.5-inch disks come with such pads included.
They can also be included in the housing kit.

Notice!
It is necessary to select the length of the connecting cable (loop). In some cases, the cable does not reach the new hard drive. Try moving it to a closer compartment, or use a longer cable. The IDE drive cable length is limited to 45cm, the shorter the better. However, in some cases you can find longer cables, up to 67 cm, and also having 80 cores. Long cables, especially those with a non-standard, ‘rounded’ length, are not recommended, especially for drives with a data transfer rate of 133 Mbit/s. Using cables that are too long causes transmission timing errors and signal weakening, and may also corrupt the data on the disc. If you use a train longer than 45 cm, then, as they say, you are creating problems for yourself.
After unpacking your new hard drive, you should have the following available:
- the device itself;
- software (optional);
- mounting pads and screws.
Devices supplied as OEM, i.e. in packages, they may not contain anything other than themselves. In this case, you will have to take care of the cables, screws and other accessories yourself.
Mounting an ATA (PATA) Hard Drive
To install an ATA hard drive, follow these steps:
1. See if your computer has an unused 40-wire IDE connector. With a Pentium processor, you can install four IDE devices in your computer (two for each channel).

Advice!
To improve the performance of simultaneously used devices, such as storage drives and optical hard drives, they are connected to different cables. It is not recommended to hang the hard drive and drive on the same cable.
2. Pay attention to how the cable is connected to the drive. The red wire of the power cable is connected to the first pin of the drive connector. Despite the fact that the plug has a special key against incorrect connection to the hard drive, it can easily be connected incorrectly, which will lead to failure of the device.

The first contact of the cable is most often oriented closer to the device's power connector. There is a special key on the cable for proper connection to the device.

Advice!
Remember that modern ATA hard drives require an 80-core cable to operate in Ultra-DMA speed modes (66-133 Mbit/s); it can also be used to connect older devices. The 40-core cable can be used to connect devices with speeds of 33 Mbps and slower. The advantage of the 80-core cable is that you only have to install the CS (Cable Select) jumper on the devices, and you do not need to choose which device will be the master and which the slave. Today, an ATA connection is already quite rare; all modern hard drives are connected via a SATA interface.
3. Set the Master/Slave/Cable Select switches on the back of the hard drive. When using an 80-wire cable, it is enough to install the Cable Select jumper on all devices. Otherwise, one of the devices connected to the loop must be the Master and the other must be the Slave. Please note that some legacy devices, when used as masters paired with another slave, require simultaneous installation of Master and Slave jumpers. But today, you are unlikely to come across such hard drives in your hands.

4. Place the drive in the 3.5-inch chassis bay and secure it with screws. When performing this operation, significant mechanical forces must not be applied - the drive must freely fall into place in the case.

Make sure the screws are not too long. If the screw is longer than the depth of the hole into which it will be screwed, you can damage the device and strip the threads.
5. Connect the interface cable to the back of the drive. If an 80-wire cable is used, the blue plug should be inserted into the motherboard connector, the black plug into the master socket, and the gray (usually the middle) plug into the slave socket.

6. Connect the power cable to the hard drive; most often it is a four-wire cable with a standard connector.

This completes the installation of a hard drive with an ATA interface.
Let's look at connecting SATA hard drives.
Mounting SATA hard drives
The step-by-step procedure for installing a SATA hard drive is slightly different from installing ATA drives.
1. Check if your system has unused SATA connectors.

2. Carefully insert the hard drive into the appropriately sized bay, using pads if necessary, and tighten the retaining screws.
3. Connect the SATA data cable to the SATA controller. Data cables can be bundled together with a SATA power cable. When using a separate data cable, one connector connects to the drive and the other to the SATA controller.

4. Connect the appropriate power cable to the drive. Some SATA devices have two power connectors: a standard 4-pin and a special 15-pin - in this case, supply power to either of them (but not both at the same time). If the device only has a 15-pin power connector, and the power supply does not offer such a plug, you will have to additionally purchase a special “4 to 15” adapter (if it is not included with the device).


Connecting power via a special “4 to 15” adapter
Attention! If the device simultaneously has 2 power connectors (standard, 4-pin, and SATA-type, 15-pin), do not apply power to both connectors at the same time, otherwise you may damage the device.

system configuration
Once the hard drive is mounted in the computer case, you can begin configuring the system. The computer needs to be told information about the drive so it can boot from it when the power is turned on.
On Windows 2000, XP, Vista and 7 systems, the command is used. They can be found on the operating system boot CD. If you are installing an operating system on the new drive, it will be partitioned and formatted as part of the overall OS installation process.
If you want, you can create partitions and format them manually before installing the operating system, but you will have to use special programs to do this. It’s easier to do this during installation of the system and using its tools.
Automatic detection of hard drive type
For almost all PATA and SATA drives, modern BIOSes provide automatic type detection, i.e. At the request of the system, its characteristics and necessary parameters are read from the drive. With this approach, errors that can be made when entering parameters manually are practically eliminated.
So, let's get started.
1. Turn on the computer and press the key required to enter the BIOS settings, usually Delete or F1. If the BIOS provides automatic device detection, it is recommended to set this mode, as the optimal device parameters will be determined. SATA devices may also support ACHI mode and grouping multiple devices into a RAID array. Set the ACHI option for SATA drives if supported and exit the BIOS Setup.

2. Reboot the system. If the installed device is not bootable and you are running Windows XP or later, the new drive will be automatically detected during the boot process and the necessary drivers will be installed for it. It should be noted that the system will not see the new device as a volume (that is, it will not be assigned a letter) until the disk partitions are created and formatted.
If the new device is bootable, you will have to boot from the CD again to partition, format, and install the operating system on the new drive. If the motherboard supports SATA in ACHI mode or SATA RAID arrays and you are running Windows XP or an earlier version of this OS, you will need to use a floppy disk with controller drivers or copy the drivers to the Windows installation disk or use a floppy drive to install the device. Otherwise, the system will not recognize the hard drive and the system installation process will not be possible.

I note that all the necessary drivers are already integrated into the new Windows Vista and 7 operating systems, and when installing them, there are no problems identifying the hard drive controller.
Determining the drive type manually
If your computer has a motherboard that does not support auto-detection, you will have to manually enter the appropriate information into the BIOS. There are several standard combinations available in the BIOS, but they are most likely outdated, since they only support drives with a capacity of a few hundred megabytes, or even less. Most often, you will have to select a custom hard drive type and then specify the following settings:
- number of cylinders;
- number of heads;
- number of sectors per track.
The required settings can be found in the documentation that came with the hard drive, but they may be printed on a label on the hard drive's chassis. Be sure to remember or write them down.
The latter option is preferable, since you will need the parameter values in the event that the system BIOS suddenly “forgets” them due to a dead battery on the motherboard. It is best to store the recorded information directly inside the system unit; for example, they can be glued to the case using adhesive tape. Sometimes this can save a lot of time.
If you are unable to determine the correct parameters for your hard drive, contact the manufacturer's website. You can also use one of the diagnostic utilities available for download over the Internet.
Depending on the BIOS manufacturer and its version, you are given the opportunity to configure other hard drive parameters, in particular the data transfer mode and addressing of logical blocks.
Still, if the BIOS of your motherboard does not support the automatic detection function, then you need to think about upgrading your computer and replacing the outdated motherboard with a more modern one, which includes many different functions, including support for modern hard drives.
This material describes how to enable AHCI mode without reinstalling and without embedding SATA drivers into the Windows distribution. This material is intended for those who, when installing Windows XP, enabled the IDE-mode option in the BIOS and now want to switch the controller operating mode to AHCI.
Preparing for SATA Driver Integration
To do this, you will need the SATA drivers themselves. For chipsets from Intel, download from this link: /. They are also in this archive with the nLite program and instructions: /
For chipsets from AMD 7th series (Puma platform), download drivers from this link:
Algorithm for integrating SATA drivers into an already installed Windows XP
1. Launch device Manager(My Computer -> Properties -> Hardware -> Device Manager), go to IDE ATA/ATAPI controllers and select the first device (in the screenshot the device is already installed. You will have it standard for IDE):
2.Select installation from the specified location:

3.Don't search...

4. Click Install from disk:

5. Unpack the downloaded drivers into a folder and indicate the path to it... Those drivers are also on the recovery disk with drivers and applications

6. Select the driver, first unchecking the “Only compatible devices” checkbox:

8. Set AHCI mode in BIOS. Windows will now boot into this mode.
After downloading, the new device will be installed.
9. Install Intel Matrix Storage Manager. The latest version can be downloaded from this link:
A very common installation problem Windows XP- this is the appearance of a missing hard drive error.
The problem is that modern computers, especially laptops, use hard drive controllers manufactured much later than Windows XP.
Therefore, the standard version of Windows XP does not contain the necessary drivers for installation.
One way to get around this problem is to switch to BIOS operating mode of the SATA controller.
It is necessary to switch the operating mode of the SATA controller to IDE Mode. But often in BIOS Laptops do not have this option.
In this case, SATA drivers can be integrated directly into the Windows distribution using the program nLite.
This method is the most convenient, safe, and the resulting Windows XP image can be reused.
Also, this option remains the only one for laptop owners, since they do not have the ability to connect a floppy drive.
So, how to integrate drivers into the Windows XP distribution?
For integration we need:
1. Windows XP distribution. It is highly recommended to use the original Windows XP image. It is also better to take Windows XP SP2, and after installing Windows, install service pack 3.
2. nLite program. It should be downloaded from the manufacturer’s website (download). If driver integration takes place on a computer with Windows XP installed, then for the program to work you must also install Microsoft .NET Framework 2.0(download). For Windows Vista and higher, you do not need to install anything other than the program.
3. Sata/RAid controller drivers:
Driver integration.
Installing the program nLite.
Download the SATA drivers and save them on your computer. After this, you need to unpack them into some folder (for example C:/SATA/).
Insert the disc with Windows XP into the CD/DVD drive and copy the entire contents of the disc to the hard drive, for example to a folder C:/WINXP/.
Launch the program nLite. When starting, you can immediately specify the program interface language - Russian.
To continue, press the button " Further". In the window that appears " Location of Windows installation files"needed after pressing the button" Review"specify the path to the folder C:/WINXP/, where the contents of the Windows XP disk were copied.
after a little checking the program nLite will provide us with detailed information about the version of Windows XP
In the window " Selecting tasks"Note in the section Integrate paragraph Drivers, and in the section Create- Bootable ISO image.
and in the menu that appears, select " Drivers folder"
specify the path to the folder with unpacked drivers
Here and below, it is very important to point to the folder with drivers of the exact bit size that corresponds to the Windows distribution you are using. Should be integrated into 32-bit Windows XP only drivers for a 32-bit system (in the 32-bit or x86 folder), and for a 64-bit OS - drivers for a 64-bit system (they are in the 64-bit or x64 folder).
This is a very important point, otherwise an error may appear during Windows installation
"The file ahcix64.sys is corrupted. Press any key to continue".
In the window that appears " Select drivers for integration"specify the required ones (use the key CTRL to select several). Don't forget about the bit depth of your Windows XP.
After selecting the drivers, click " OK". In the next dialog box we also select drivers. For Intel drivers, you can safely select all drivers ( CTRL+A), for AMD drivers, observe the bit depth.
After selecting, click " OK". In the next window, click " Further".
agree to start the integration process by clicking the " Yes".
Integration is underway.
After completing the integration of SATA drivers, press the " Further" to continue
The window " Bootable ISO image". Insert a blank CD into the CD/DVD burner. Wait for it to be initialized by the program nLite. We indicate the label we need (for example, WinXP_SP2). Select the recording speed. For high-quality recording, it is better to choose the lowest speed.
After the necessary settings, press the button " Record" and agree to burn the disc by clicking the " button Yes".
All you have to do is wait until the disc is finished recording.
After this, we insert the disk into the drive of the computer we need, reboot and install Windows XP.
After installing Windows XP, install drivers and Service Pack 3, if the XP image came with SP2.